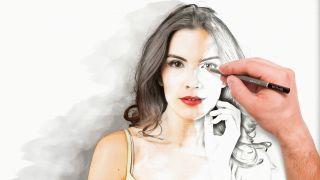
Photoshop is as beloved by artists as it is by photographers, and in this project we are going to combine art forms, giving a portrait a hand-drawn, hand-painted effect – complete with the artist’s arm ‘sketching’ their masterpiece for a 3D look.
You will need a portrait plus a photo of a hand holding a pencil or brush - use a simple portrait with a plain background, as this works best for a convincing-looking drawing.
For the hand, position the subject’s arm on a white background – such as a sheet of plain paper – and shoot from directly above to keep everything in as level a plane of focus as possible, using a mid-range aperture for a good depth of field. A flashgun will add a slight shadow, helping the end image look more realistic.
The technique makes extensive use of Photoshop’s Filter Gallery to provide painterly effects, brush tools to provide different textures, and plenty of layers set at various opacities combined with a variety of blending modes to mix and match the layers together.
The end result indeed looks impressive, but is surprisingly easy to achieve…
Step-by-step: Bring your sketches to life
1. Paint a portrait
Duplicate the portrait layer three times (Ctrl+J). On the second layer go: Filters > Filter Gallery > Artistic > Cutout; Levels 7, Simplicity 3, Fidelity 2. Change Blending Mode to Luminosity at 40% opacity.
2. Restore detail
Third layer: Filters > Filter Gallery > Stylize > Glowing Edges; Width 5, Brightness 8, Smoothness 5. Invert (Ctrl+I), desaturate (Ctrl+Shift+U). Blending Mode: Multiply, 50% opacity. Merge (Ctrl+Shift+Alt+E).
3. Sketch an outline
Desaturate and duplicate the top layer, then invert the copied layer. Set Blending Mode to Colour Dodge, then go Filters > Blur > Gaussian Blur and set Radius to 60 pixels. Merge (Ctrl+Shift+Alt+E).
4. Mix & match media
Move the merged painted layer under the top layer. Apply a layer mask to the top layer. Set the Brush tool to black and 40% opacity, right-click, select Oil Medium Wet Flow. Paint parts of the image to colour it.
5. Enter the artist...
Select the hand with Quick Selection, then drag it to the portrait image with the Move tool. Shift-drag a corner to scale the hand. Set Blending Mode to Multiply. Duplicate this layer, and desaturate the original.
6. Make your hand 3D
Select duplicated hand layer. Set Blending Mode to Normal. Apply a layer mask. Draw around the hand with a black brush to reveal shadow. Dodge the shadow edge in the B&W hand layer to blend harsh lines.
7. Soften the skin tones
Select brushed-through colour layer and apply a layer mask. Paint the darker areas of the face and hair with a black brush, opacity around 20%. Reduce layer opacity to around 85% to create a lighter look.
8. Textured canvas paper
Create a new layer, press Shift+F5 to fill; Use White and 100% opacity. Go Filters > Filter Gallery > Textures > Texturizer. Set Scaling 70%, Relief 4. Set Blending Mode to Multiply. Move hand layer to the top.
9. Blend it all together
Create a Colour Balance adjustment layer and increase the Yellow/Blue slider by 1-2 points for a faint aged glow. Increase contrast slightly with a Curves adjustment layer to bring out the features in the face.
How to create a cartoon effect in Photoshop
