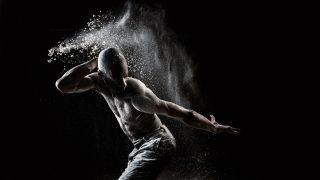
Shooting a moving subject like a dancer throws up several challenges, not least of which is trying to convey that sense of graceful motion in a still image. But something as simple as a handful or flour can show off the action in a wonderfully atmospheric way.
The fine white powder hangs in the air, shifting with the action and creating dusty whorls that catch the light. It also makes an almighty mess, but that’s certainly a price worth paying for the extra flavour the flour gives the shoot.
In this tutorial we’ll explain how to get set up and shoot your own evocative flour portraits. Lighting plays a big part, and a three Speedlight set-up here gives us beautiful backlighting that emphasises the shape of the body and lifts the flour. What’s more, you don’t even need a studio. Any decent-sized space will do – you could even shoot it outdoors on a dry night.
Step-by-step: just add flour
1. Find a dark place
We need a dim environment and a dark backdrop, so we shot in a private underground car park. Arrange dust sheets to minimise the mess, but be aware their colour might affect the light; here the reflected light from the blue material gave us an intentionally cool cast.
2. Light the subject
Our Speedlights are positioned on light stands, angled away from the backdrop to prevent spill, and set to manual power with the settings shown. The front light is fitted with a white shoot-through umbrella, the back left has a silver umbrella and the back right a beauty dish.
3. Set the exposure
We fire the Speedlights using a wireless trigger fitted to the camera and a receiver on one of the flashguns; the others are set to optical Slave mode. The camera’s set to manual with a shutter speed of 1/200 sec, then we adjust aperture and ISO until the exposure looks right.
4. Sprinkle the flour
We asked our model P-J to hold flour in his hands then release it as he danced and moved. To show the movement in different parts of the body try sprinkling flour over the shoulders, arms and feet. If your subject has long hair, you could try sprinkling it there too.
5. Work the poses
It really helps if you can work with a subject who knows how to move their body. If you can trust them to get into interesting positions, it frees you to concentrate on perfecting the technique, timing and composition. Even so, it might take several attempts to nail the pose.
6. Direct your subject
Strong back- and side-lighting gives us these bright highlights along both sides of the body. We need to pose the subject to make the most of this edge light, asking them to turn the head and body one way or the other as they move. A straight-on pose wouldn’t work here.
Freeze with flash
It’s not so much the shutter speed that freezes the motion here, it’s the flash duration. That’s because we’re in a dim room, so the only light that registers is the brief burst from mthe Speedlight, which is far quicker than the camera’s maximum flash sync speed (usually 1/200 or 1/250 sec). The lower the Speedlight power, the faster the flash duration.
When fired at full power the duration may even be close to 1/200 sec, but at 1/16 power the duration will shrink to around 1/8000 sec or faster (depending on your Speedlight).
So if you’re seeing motion blur in your flash-lit action shots lower the flash power and bump up the ISO.
Top tip
You don’t need expensive flashes for this, they only need to have manual power and an optical slave mode – features that budget models will usually have.
This feature was originally published in N-Photo Magazine, to subscribe, click here
How to paint with light
Best flashguns for Nikon DSLRs
